Отправка Nginx json логов с помощью Vector в Clickhouse и Elasticsearch

Vector, предназначенной для сбора, преобразования и отправки данных логов, метрик и событий.
Будучи написанной на языке Rust, она отличается высокой производительностью и низким потреблением оперативной памяти по сравнению с аналогами. Кроме того, большое внимание уделено функциям, связанным с корректностью, в частности, возможностям сохранения неотправленных событий в буфер на диске и ротации файлов.
Архитектурно Vector является роутером событий, принимающим сообщения из одного или нескольких источников, опционально применяющим над этими сообщениями преобразования, и отправляющим их в один или несколько стоков.
Vector это замена filebeat и logstash, он может выступать в обоих ролях (получать и отправлять логи), более подробней на их сайте.
Если в Logstash цепочка строится как input → filter → output то в Vector это sources → transforms → sinks
Примеры можно посмотреть в документации.
Эта инструкция переработанная инстукция от Вячеслава Рахинского. В оригинальной инструкции есть обработка geoip. У меня при тестировании geoip из внутренней сети, vector выдавал ошибку.
Aug 05 06:25:31.889 DEBUG transform{name=nginx_parse_rename_fields type=rename_fields}: vector::transforms::rename_fields: Field did not exist field=«geoip.country_name» rate_limit_secs=30Если кому-то нужно обрабатывать geoip, то обратитесь ко оригинальной инструкции от Вячеслава Рахинского.
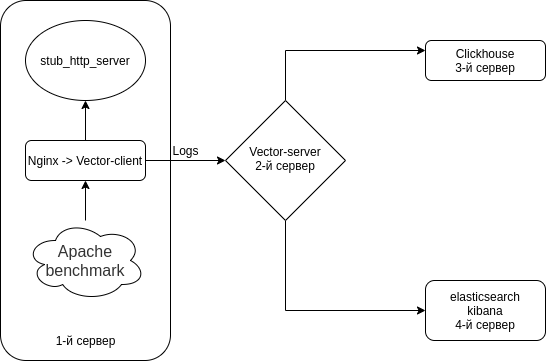
Будем настраивать связку Nginx (Access logs) → Vector (Client | Filebeat) → Vector (Server | Logstash) → Clickhouse. Установим 3 сервера. Хотя можно обойти 2 серверами.

Схема примерно такая.
Выключаем Selinux на всех ваших серверах
sed -i 's/^SELINUX=.*/SELINUX=disabled/g' /etc/selinux/config
reboot
На все сервера устанавливаем эмулятор HTTP сервера + утилиты
В качестве эмулятора HTTP сервера будем использовать nodejs-stub-server от Maxim Ignatenko
Nodejs-stub-server не имеет rpm. Здесь https://github.com/patsevanton/nodejs-stub-server создаем ему rpm. Собираться rpm будет с помощью Fedora Copr
Добавляем репозиторий antonpatsev/nodejs-stub-server
yum -y install yum-plugin-copr epel-release
yes | yum copr enable antonpatsev/nodejs-stub-server
Устанавливаем nodejs-stub-server, Apache benchmark и терминальный мультиплексор screen на все сервера
yum -y install stub_http_server screen mc httpd-tools screenПоправил в файле /var/lib/stub_http_server/stub_http_server.js время ответа stub_http_server чтобы было больше логов.
var max_sleep = 10;Запустим stub_http_server.
systemctl start stub_http_server
systemctl enable stub_http_server
Установка Clickhouse на 3 сервере
ClickHouse используют набор инструкций SSE 4.2, поэтому, если не указано иное, его поддержка в используемом процессоре, становится дополнительным требованием к системе. Вот команда, чтобы проверить, поддерживает ли текущий процессор SSE 4.2:
grep -q sse4_2 /proc/cpuinfo && echo "SSE 4.2 supported" || echo "SSE 4.2 not supported"Сначала нужно подключить официальный репозиторий:
sudo yum install -y yum-utils
sudo rpm --import https://repo.clickhouse.tech/CLICKHOUSE-KEY.GPG
sudo yum-config-manager --add-repo https://repo.clickhouse.tech/rpm/stable/x86_64
Для установки пакетов необходимо выполнить следующие команды:
sudo yum install -y clickhouse-server clickhouse-clientРазрешаем clickhouse-server слушать сетевую карту в файле /etc/clickhouse-server/config.xml
0.0.0.0 Меняем уровень логирования c trace до debug
debug
Настройки сжатия стандартные:
min_compress_block_size  65536
max_compress_block_size  1048576
Для активации Zstd сждатия конфиг посоветовали не трогать, а лучше применять DDL.

Как применить zstd сжатие через DDL в гугле я не нашел. Поэтому оставил как есть.
Коллеги, кто использет zstd сжатие в Clickhouse — поделить, пожалуйста, инструкциями.
Для запуска сервера в качестве демона, выполните:
service clickhouse-server startТеперь перейдем к настройке Clickhouse
Заходим в Clickhouse
clickhouse-client -h 172.26.10.109 -m172.26.10.109 — IP сервера где установлен Clickhouse.
Создадим БД vector
CREATE DATABASE vector;Проверим что бд есть.
show databases;Создаем таблицу vector.logs.
/* Это таблица где хранятся логи как есть */

CREATE TABLE vector.logs
(
    `node_name` String,
    `timestamp` DateTime,
    `server_name` String,
    `user_id` String,
    `request_full` String,
    `request_user_agent` String,
    `request_http_host` String,
    `request_uri` String,
    `request_scheme` String,
    `request_method` String,
    `request_length` UInt64,
    `request_time` Float32,
    `request_referrer` String,
    `response_status` UInt16,
    `response_body_bytes_sent` UInt64,
    `response_content_type` String,
    `remote_addr` IPv4,
    `remote_port` UInt32,
    `remote_user` String,
    `upstream_addr` IPv4,
    `upstream_port` UInt32,
    `upstream_bytes_received` UInt64,
    `upstream_bytes_sent` UInt64,
    `upstream_cache_status` String,
    `upstream_connect_time` Float32,
    `upstream_header_time` Float32,
    `upstream_response_length` UInt64,
    `upstream_response_time` Float32,
    `upstream_status` UInt16,
    `upstream_content_type` String,
    INDEX idx_http_host request_http_host TYPE set(0) GRANULARITY 1
)
ENGINE = MergeTree()
PARTITION BY toYYYYMMDD(timestamp)
ORDER BY timestamp
TTL timestamp + toIntervalMonth(1)
SETTINGS index_granularity = 8192;
Проверяем что создались таблицы. Запускаем clickhouse-client и делаем запрос.
Переходим в бд vector.
use vector;

Ok.

0 rows in set. Elapsed: 0.001 sec.
Смотрим таблицы.
show tables;

┌─name────────────────┐
│ logs                │
└─────────────────────┘
Установка elasticsearch на 4-ом сервере для отправки тех же данных в Elasticsearch для сравнения с Clickhouse
Добавим публичный rpm ключ
rpm --import https://artifacts.elastic.co/GPG-KEY-elasticsearchСоздадим 2 репо:
/etc/yum.repos.d/elasticsearch.repo
[elasticsearch]
name=Elasticsearch repository for 7.x packages
baseurl=https://artifacts.elastic.co/packages/7.x/yum
gpgcheck=1
gpgkey=https://artifacts.elastic.co/GPG-KEY-elasticsearch
enabled=0
autorefresh=1
type=rpm-md
/etc/yum.repos.d/kibana.repo
[kibana-7.x]
name=Kibana repository for 7.x packages
baseurl=https://artifacts.elastic.co/packages/7.x/yum
gpgcheck=1
gpgkey=https://artifacts.elastic.co/GPG-KEY-elasticsearch
enabled=1
autorefresh=1
type=rpm-md
Установим elasticsearch и kibana
yum install -y kibana elasticsearchТак как будет в 1 экземпляре, то в файл /etc/elasticsearch/elasticsearch.yml нужно добавить:
discovery.type: single-nodeЧтобы vector смог отправлять данные в elasticsearch с другого сервера изменим network.host.
network.host: 0.0.0.0Чтобы подключится к kibana изменим параметр server.host в файл /etc/kibana/kibana.yml
server.host: "0.0.0.0"Старуем и включаем в автозапуск elasticsearch
systemctl enable elasticsearch
systemctl start elasticsearch
и kibana
systemctl enable kibana
systemctl start kibana
Настройка Elasticsearch для single-node режима 1 shard, 0 replica. Скорее всего у ва будет кластер из большого количества серверов и вам это делать не нужно.
Для будущих индексов обновляем шаблон по умолчанию:
curl -X PUT http://localhost:9200/_template/default -H 'Content-Type: application/json' -d '{"index_patterns": ["*"],"order": -1,"settings": {"number_of_shards": "1","number_of_replicas": "0"}}' yum install -y https://packages.timber.io/vector/0.9.X/vector-x86_64.rpm mc httpd-tools screenНастроим Vector как замену Logstash. Редактируем файл /etc/vector/vector.toml
# /etc/vector/vector.toml

data_dir = "/var/lib/vector"

[sources.nginx_input_vector]
  # General
  type                          = "vector"
  address                       = "0.0.0.0:9876"
  shutdown_timeout_secs         = 30

[transforms.nginx_parse_json]
  inputs                        = [ "nginx_input_vector" ]
  type                          = "json_parser"

[transforms.nginx_parse_add_defaults]
  inputs                        = [ "nginx_parse_json" ]
  type                          = "lua"
  version                       = "2"

  hooks.process = """
  function (event, emit)

    function split_first(s, delimiter)
      result = {};
      for match in (s..delimiter):gmatch("(.-)"..delimiter) do
          table.insert(result, match);
      end
      return result[1];
    end

    function split_last(s, delimiter)
      result = {};
      for match in (s..delimiter):gmatch("(.-)"..delimiter) do
          table.insert(result, match);
      end
      return result[#result];
    end

    event.log.upstream_addr             = split_first(split_last(event.log.upstream_addr, ', '), ':')
    event.log.upstream_bytes_received   = split_last(event.log.upstream_bytes_received, ', ')
    event.log.upstream_bytes_sent       = split_last(event.log.upstream_bytes_sent, ', ')
    event.log.upstream_connect_time     = split_last(event.log.upstream_connect_time, ', ')
    event.log.upstream_header_time      = split_last(event.log.upstream_header_time, ', ')
    event.log.upstream_response_length  = split_last(event.log.upstream_response_length, ', ')
    event.log.upstream_response_time    = split_last(event.log.upstream_response_time, ', ')
    event.log.upstream_status           = split_last(event.log.upstream_status, ', ')

    if event.log.upstream_addr == "" then
        event.log.upstream_addr = "127.0.0.1"
    end

    if (event.log.upstream_bytes_received == "-" or event.log.upstream_bytes_received == "") then
        event.log.upstream_bytes_received = "0"
    end

    if (event.log.upstream_bytes_sent == "-" or event.log.upstream_bytes_sent == "") then
        event.log.upstream_bytes_sent = "0"
    end

    if event.log.upstream_cache_status == "" then
        event.log.upstream_cache_status = "DISABLED"
    end

    if (event.log.upstream_connect_time == "-" or event.log.upstream_connect_time == "") then
        event.log.upstream_connect_time = "0"
    end

    if (event.log.upstream_header_time == "-" or event.log.upstream_header_time == "") then
        event.log.upstream_header_time = "0"
    end

    if (event.log.upstream_response_length == "-" or event.log.upstream_response_length == "") then
        event.log.upstream_response_length = "0"
    end

    if (event.log.upstream_response_time == "-" or event.log.upstream_response_time == "") then
        event.log.upstream_response_time = "0"
    end

    if (event.log.upstream_status == "-" or event.log.upstream_status == "") then
        event.log.upstream_status = "0"
    end

    emit(event)

  end
  """

[transforms.nginx_parse_remove_fields]
    inputs                              = [ "nginx_parse_add_defaults" ]
    type                                = "remove_fields"
    fields                              = ["data", "file", "host", "source_type"]

[transforms.nginx_parse_coercer]

    type                                = "coercer"
    inputs                              = ["nginx_parse_remove_fields"]

    types.request_length = "int"
    types.request_time = "float"

    types.response_status = "int"
    types.response_body_bytes_sent = "int"

    types.remote_port = "int"

    types.upstream_bytes_received = "int"
    types.upstream_bytes_send = "int"
    types.upstream_connect_time = "float"
    types.upstream_header_time = "float"
    types.upstream_response_length = "int"
    types.upstream_response_time = "float"
    types.upstream_status = "int"

    types.timestamp = "timestamp"

[sinks.nginx_output_clickhouse]
    inputs   = ["nginx_parse_coercer"]
    type     = "clickhouse"

    database = "vector"
    healthcheck = true
    host = "http://172.26.10.109:8123" #  Адрес Clickhouse
    table = "logs"

    encoding.timestamp_format = "unix"

    buffer.type = "disk"
    buffer.max_size = 104900000
    buffer.when_full = "block"

    request.in_flight_limit = 20

[sinks.elasticsearch]
    type = "elasticsearch"
    inputs   = ["nginx_parse_coercer"]
    compression = "none"
    healthcheck = true
    # 172.26.10.116 - сервер где установен elasticsearch
    host = "http://172.26.10.116:9200"
    index = "vector-%Y-%m-%d"
Вы можете откорректировать секцию transforms.nginx_parse_add_defaults.
Так как Вячеслав Рахинский использует данные конфиги для небольшого CDN и там в upstream_* может прилетать несколько значений
Например:
"upstream_addr": "128.66.0.10:443, 128.66.0.11:443, 128.66.0.12:443"
"upstream_bytes_received": "-, -, 123"
"upstream_status": "502, 502, 200"
Если это не ваша ситуация то эту секцию можно упростить
Создадим настройки service для systemd /etc/systemd/system/vector.service
# /etc/systemd/system/vector.service

[Unit]
Description=Vector
After=network-online.target
Requires=network-online.target

[Service]
User=vector
Group=vector
ExecStart=/usr/bin/vector
ExecReload=/bin/kill -HUP $MAINPID
Restart=no
StandardOutput=syslog
StandardError=syslog
SyslogIdentifier=vector

[Install]
WantedBy=multi-user.target
После создания таблиц можно запускать Vector
systemctl enable vector
systemctl start vector
Логи vector можно посмотреть так
journalctl -f -u vectorВ логах должны быть такие записи
INFO vector::topology::builder: Healthcheck: Passed.
INFO vector::topology::builder: Healthcheck: Passed.
На клиенте (Web server) — 1-й сервер
На cервере с nginx необходимо выключить ipv6, так как в таблице logs в clickhouse используется поле upstream_addr IPv4, так как я не использую ipv6 внутри сети. Если ipv6 не выключить, то будут ошибки:
DB::Exception: Invalid IPv4 value.: (while read the value of key upstream_addr)Возможно читатели, добавлять поддержку ipv6.
Создаем файл /etc/sysctl.d/98-disable-ipv6.conf
net.ipv6.conf.all.disable_ipv6 = 1
net.ipv6.conf.default.disable_ipv6 = 1
net.ipv6.conf.lo.disable_ipv6 = 1
Применяем настройки
sysctl --systemУстановим nginx.
Добавил файл репозитория nginx /etc/yum.repos.d/nginx.repo
[nginx-stable]
name=nginx stable repo
baseurl=http://nginx.org/packages/centos/$releasever/$basearch/
gpgcheck=1
enabled=1
gpgkey=https://nginx.org/keys/nginx_signing.key
module_hotfixes=true
Установим пакет nginx
yum install -y nginxДля начала нам надо настроить формат логов в Nginx в файле /etc/nginx/nginx.conf
user  nginx;
# you must set worker processes based on your CPU cores, nginx does not benefit from setting more than that
worker_processes auto; #some last versions calculate it automatically

# number of file descriptors used for nginx
# the limit for the maximum FDs on the server is usually set by the OS.
# if you don't set FD's then OS settings will be used which is by default 2000
worker_rlimit_nofile 100000;

error_log  /var/log/nginx/error.log warn;
pid        /var/run/nginx.pid;

# provides the configuration file context in which the directives that affect connection processing are specified.
events {
    # determines how much clients will be served per worker
    # max clients = worker_connections * worker_processes
    # max clients is also limited by the number of socket connections available on the system (~64k)
    worker_connections 4000;

    # optimized to serve many clients with each thread, essential for linux -- for testing environment
    use epoll;

    # accept as many connections as possible, may flood worker connections if set too low -- for testing environment
    multi_accept on;
}

http {
    include       /etc/nginx/mime.types;
    default_type  application/octet-stream;

    log_format  main  '$remote_addr - $remote_user [$time_local] "$request" '
                      '$status $body_bytes_sent "$http_referer" '
                      '"$http_user_agent" "$http_x_forwarded_for"';

log_format vector escape=json
    '{'
        '"node_name":"nginx-vector",'
        '"timestamp":"$time_iso8601",'
        '"server_name":"$server_name",'
        '"request_full": "$request",'
        '"request_user_agent":"$http_user_agent",'
        '"request_http_host":"$http_host",'
        '"request_uri":"$request_uri",'
        '"request_scheme": "$scheme",'
        '"request_method":"$request_method",'
        '"request_length":"$request_length",'
        '"request_time": "$request_time",'
        '"request_referrer":"$http_referer",'
        '"response_status": "$status",'
        '"response_body_bytes_sent":"$body_bytes_sent",'
        '"response_content_type":"$sent_http_content_type",'
        '"remote_addr": "$remote_addr",'
        '"remote_port": "$remote_port",'
        '"remote_user": "$remote_user",'
        '"upstream_addr": "$upstream_addr",'
        '"upstream_bytes_received": "$upstream_bytes_received",'
        '"upstream_bytes_sent": "$upstream_bytes_sent",'
        '"upstream_cache_status":"$upstream_cache_status",'
        '"upstream_connect_time":"$upstream_connect_time",'
        '"upstream_header_time":"$upstream_header_time",'
        '"upstream_response_length":"$upstream_response_length",'
        '"upstream_response_time":"$upstream_response_time",'
        '"upstream_status": "$upstream_status",'
        '"upstream_content_type":"$upstream_http_content_type"'
    '}';

    access_log  /var/log/nginx/access.log  main;
    access_log  /var/log/nginx/access.json.log vector;      # Новый лог в формате json

    sendfile        on;
    #tcp_nopush     on;

    keepalive_timeout  65;

    #gzip  on;

    include /etc/nginx/conf.d/*.conf;
}
Что бы не поломать вашу текущую конфигурациию, Nginx позволяет иметь несколько директив access_log
access_log  /var/log/nginx/access.log  main;            # Стандартный лог
access_log  /var/log/nginx/access.json.log vector;      # Новый лог в формате json
Не забудте добавить правило в logrotate для новых логов (если log фаил не заканчивается на .log)
Удаляем default.conf из /etc/nginx/conf.d/
rm -f /etc/nginx/conf.d/default.confДобавляем виртуальный хост /etc/nginx/conf.d/vhost1.conf
server {
    listen 80;
    server_name vhost1;
    location / {
        proxy_pass http://172.26.10.106:8080;
    }
}
Добавляем виртуальный хост /etc/nginx/conf.d/vhost2.conf
server {
    listen 80;
    server_name vhost2;
    location / {
        proxy_pass http://172.26.10.108:8080;
    }
}
Добавляем виртуальный хост /etc/nginx/conf.d/vhost3.conf
server {
    listen 80;
    server_name vhost3;
    location / {
        proxy_pass http://172.26.10.109:8080;
    }
}
Добавляем виртуальный хост /etc/nginx/conf.d/vhost4.conf
server {
    listen 80;
    server_name vhost4;
    location / {
        proxy_pass http://172.26.10.116:8080;
    }
}
Добавляем в файл /etc/hosts виртуальные хосты (172.26.10.106 ip сервера где установлен nginx) на все сервера:
172.26.10.106 vhost1
172.26.10.106 vhost2
172.26.10.106 vhost3
172.26.10.106 vhost4
И если все готово то
nginx -t
systemctl restart nginx
Теперь установим сам Vector
yum install -y https://packages.timber.io/vector/0.9.X/vector-x86_64.rpmСоздадим фаил настроек для systemd /etc/systemd/system/vector.service
[Unit]
Description=Vector
After=network-online.target
Requires=network-online.target

[Service]
User=vector
Group=vector
ExecStart=/usr/bin/vector
ExecReload=/bin/kill -HUP $MAINPID
Restart=no
StandardOutput=syslog
StandardError=syslog
SyslogIdentifier=vector

[Install]
WantedBy=multi-user.target
И настроим замену Filebeat в конфиге /etc/vector/vector.toml. IP адрес 172.26.10.108 — это IP адрес log сервера (Vector-Server)
data_dir = "/var/lib/vector"

[sources.nginx_file]
  type                          = "file"
  include                       = [ "/var/log/nginx/access.json.log" ]
  start_at_beginning            = false
  fingerprinting.strategy       = "device_and_inode"

[sinks.nginx_output_vector]
  type                          = "vector"
  inputs                        = [ "nginx_file" ]

  address                       = "172.26.10.108:9876"
Не забудте добавить юзера vector в нужную группу что бы он мог читать log файлы. Например, nginx в centos создает логи с правами группы adm.
usermod -a -G adm vectorЗапустим сервис vector
systemctl enable vector
systemctl start vector
Логи vector можно посмотреть так
journalctl -f -u vectorВ логах должна быть такая запись
INFO vector::topology::builder: Healthcheck: Passed.Нагрузочное тестирование
Тестирование проводим с помощью Apache benchmark.
На все сервера был установлен пакет httpd-tools
Запускаем тестирование с помощью Apache benchmark c 4 разных серверов в screen. Сначала запускаем терминальный мультиплексор screen, а затем запускаем тестирование с помощью Apache benchmark. Как работать с screen вы можете найти в статье https://help.ubuntu.ru/wiki/screen.
C 1-го сервера
while true; do ab -H "User-Agent: 1server" -c 100 -n 10 -t 10 http://vhost1/; sleep 1; doneC 2-го сервера
while true; do ab -H "User-Agent: 2server" -c 100 -n 10 -t 10 http://vhost2/; sleep 1; doneC 3-го сервера
while true; do ab -H "User-Agent: 3server" -c 100 -n 10 -t 10 http://vhost3/; sleep 1; doneC 4-го сервера
while true; do ab -H "User-Agent: 4server" -c 100 -n 10 -t 10 http://vhost4/; sleep 1; doneПроверим данные в Clickhouse
Заходим в Clickhouse
clickhouse-client -h 172.26.10.109 -mДелаем SQL запрос
SELECT * FROM vector.logs;

┌─node_name────┬───────────timestamp─┬─server_name─┬─user_id─┬─request_full───┬─request_user_agent─┬─request_http_host─┬─request_uri─┬─request_scheme─┬─request_method─┬─request_length─┬─request_time─┬─request_referrer─┬─response_status─┬─response_body_bytes_sent─┬─response_content_type─┬───remote_addr─┬─remote_port─┬─remote_user─┬─upstream_addr─┬─upstream_port─┬─upstream_bytes_received─┬─upstream_bytes_sent─┬─upstream_cache_status─┬─upstream_connect_time─┬─upstream_header_time─┬─upstream_response_length─┬─upstream_response_time─┬─upstream_status─┬─upstream_content_type─┐
│ nginx-vector │ 2020-08-07 04:32:42 │ vhost1      │         │ GET / HTTP/1.0 │ 1server            │ vhost1            │ /           │ http           │ GET            │             66 │        0.028 │                  │             404 │                       27 │                       │ 172.26.10.106 │       45886 │             │ 172.26.10.106 │             0 │                     109 │                  97 │ DISABLED              │                     0 │                0.025 │                       27 │                  0.029 │             404 │                       │
└──────────────┴─────────────────────┴─────────────┴─────────┴────────────────┴────────────────────┴───────────────────┴─────────────┴────────────────┴────────────────┴────────────────┴──────────────┴──────────────────┴─────────────────┴──────────────────────────┴───────────────────────┴───────────────┴─────────────┴─────────────┴───────────────┴───────────────┴─────────────────────────┴─────────────────────┴───────────────────────┴───────────────────────┴──────────────────────┴──────────────────────────┴────────────────────────┴─────────────────┴───────────────────────
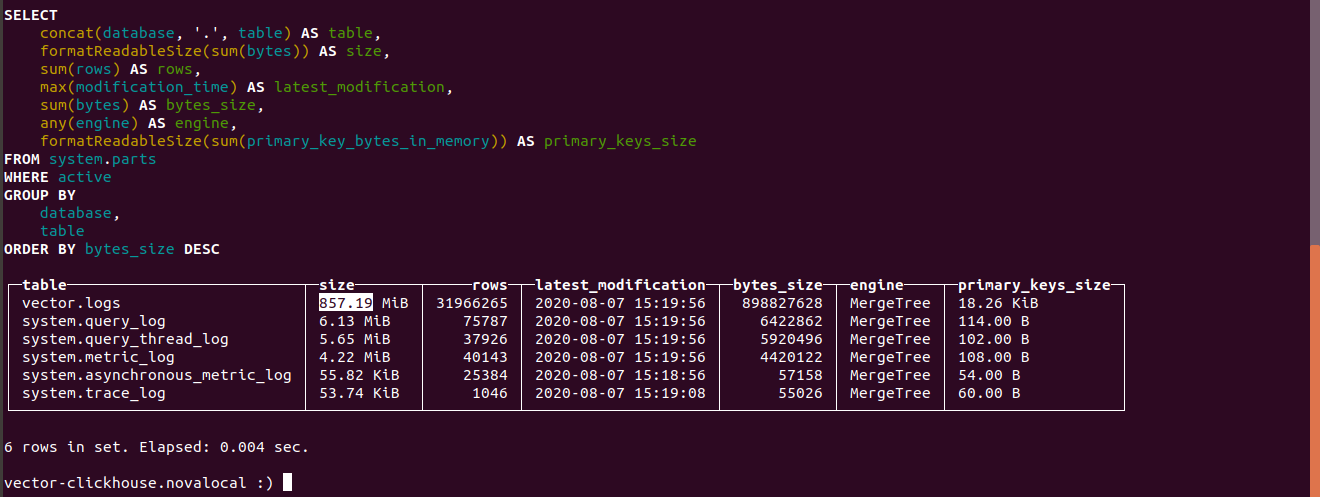
Узнаем размер таблиц в Clickhouse
select concat(database, '.', table)                         as table,
       formatReadableSize(sum(bytes))                       as size,
       sum(rows)                                            as rows,
       max(modification_time)                               as latest_modification,
       sum(bytes)                                           as bytes_size,
       any(engine)                                          as engine,
       formatReadableSize(sum(primary_key_bytes_in_memory)) as primary_keys_size
from system.parts
where active
group by database, table
order by bytes_size desc;
Узнаем сколько в Clickhouse заняли логи.

Размер таблицы logs занимает 857.19 МБ.

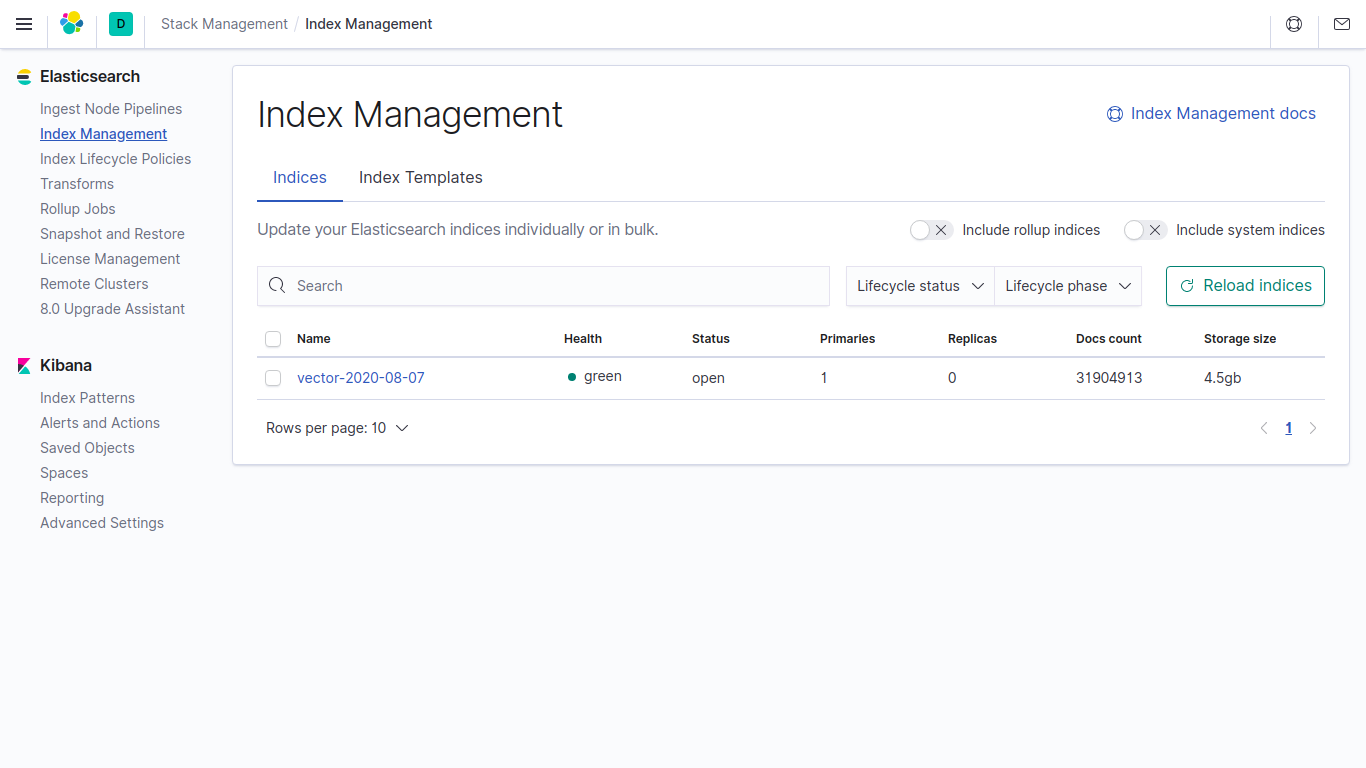
Размер тех же данных в индексе в Elasticsearch занимае 4,5ГБ.
Если в vector в параметрах не указывать в Clickhouse данные занимает в 4500/857.19 = 5.24 раза меньше чем в Elasticsearch.
В vector поле compression используется по умолчанию.
Телеграм чат по Clickhouse: https://t.me/clickhouse_ru
Телеграм чат по Elasticsearch: https://t.me/elasticsearch_ru
Телеграм чат по »Сбор и аналитика системных сообщений»: https://t.me/ru_logs
